[reviewed/revised 20 Oct 2021]
You need three corps for Cold Harbor, two of 24 units each, one of 15 units. The two 24-unit corps cover the left and right flanks of the line. The 15-unit corps is a day two reinforcement at the far right of the line. These corps should emphasize infantry with good rifles, although the reinforcing corps should have at least 4-5 melee cav. A few artillery are OK but CSA artillery at this stage of the war is a bit problematic—the Union tends to have an overwhelming amount of counter-battery fire.
There is a day-one-victory strategy that involves using your first 8 brigades (right flank) to take a nearby Union-held point called Old Cold Harbor, and holding it for a time against a counter-attack by a much larger force that is equipped with advanced weapons. It is possible to do it this way—make sure that your first eight brigades in your right-flank corps are very strong, and make sure to make no mistakes, because you can’t afford any. You have to hold the point until the timer goes to zero and you cannot lose more than 40% of your (eight-brigade) force.
Some players may not want to shortcut the battle like that, even if they think they can win it that way, so what follows is a description of the full course.
1 June 0800-1000
Center/right flank area, opposite Old Cold Harbor
Stay in your fortifications. Let the game run on fast-forward for the two hours. Late in this period, a few Union units may venture within shooting range, but they will not put up much of a fight.
1 June 1830-2000
Left flank area, at Old Church Road
Use the brigades in your lower box to defend the flag where they are. But consider sending one or two of these brigades to support the upper box brigades.
Use the 5 brigades in your upper box to attack immediately the Union position at Shady Grove Road. Your attack will trigger the arrival of Union reinforcements from the N, so set up a defensive line—though usually they don’t arrive until the phase timer is almost at zero.
1 June 1830-2215
Center/right flank area
Reorganize your brigades and artillery as needed, but otherwise stay in your defensive lines and fend off any Union attacks.
2 June 1630-2000
Center/right flank area
Reorganize your units as needed and fend off any Union attacks. If you greatly depleted the Union army before the battle so that it can’t bring a huge force against you, consider coming out from your lines and attempting an encirclement (or trapping against the map edge) and annihilation, with capturing of the Union-held flags to end the battle. This will at least allow you to avoid many hours of CSA casualties from superior Union artillery.
2 June 2000-2200
Left flank area
Defend your lines, and reposition units as needed for your defense. The Magnolia Woods position for some reason has disappeared. The Shady Grove Road position, which you must continue to hold, is now called “CSA Left Flank.”
3 June 0430-0700
Right flank area
The AI resets the positions of all your units for the start of the new day.
Union massed attacks are certain. Defend as well as you can. Usually you can encircle a large Union force at the southern end of your line.
3 June 0430-0700
Left flank area
Same advice as for the right flank—except that, while you may be able to encircle a large Union force in the center of this map, you probably won’t have enough time or force-superiority to annihilate them. In fact, in my experience the Union attack in this phase is the most threatening of the whole battle.
3 June 0700-1030
Right flank area
Union massed attacks continue. Your army should be encircling/capturing/shattering large numbers of Union units at this point.
If you have by now inflicted mass casualties on the Union and have more or less swept them from the field, go ahead and (after grabbing as many Union supply wagons as you can) take one of the Union victory points for the win.
3 June 0700-0930
Left flank area
Ditto. When this phase ends, the battle ends in CSA victory, provided that CSA holds all its original flags plus the “CSA Left Flank” position.
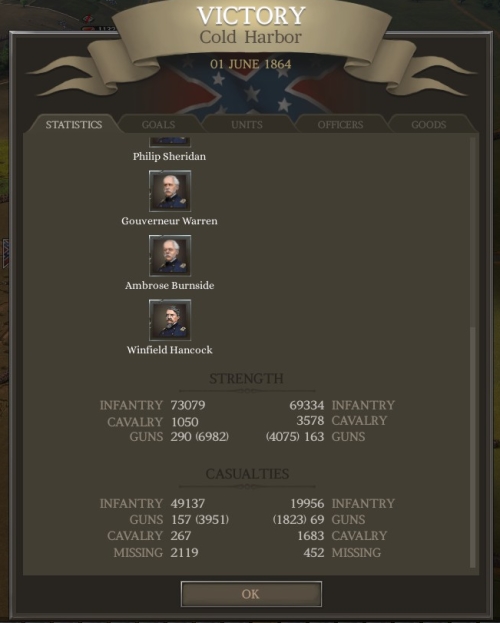
Handle the Cold Harbor battle correctly, and you will cause catastrophic casualties to the Union.
By the way, after seeing the Union’s suicide charges across open ground (historically accurate), what do you think of the generalship of U.S Grant?
J & P Rebalance Mod (1.27.4.3) BG
The greater strength of melee cav and artillery in the mod make it harder to win a day-one victory. CSA can bring 10 brigades for that initial phase, and that can include cav and artillery, but USA will always have more of those, and CSA really needs a lot of big infantry units to hold that flag. The difficulty comes not so much from holding the flag but from doing so with <40% casualties—which btw seems like a nonsensical rule, given the scale of the casualties for a multi-day battle. In any case, victory on days 2 or 3 is easy; CSA usually will outnumber USA and can end the battle pretty much any time, by sending infantry and a cavalry blob to take Beulah Church flag or Old Cold Harbor flag, or both.
♠♠♠